 Relevancy and Engagement
agclassroom.org/il/
Lesson Plan
How Does Your Garden Grow? (Grades K-2)
Grade Level
Purpose
Students discover the needs of a seed to germinate and the needs of a plant to grow while exploring the life stages of a flowering plant. Grades K-2
Estimated Time
Materials Needed
Activity 1: Observing and Dissecting Seeds
- Variety of seeds
- Bean Seed Diagram
- Hand lenses
- Lima beans soaked in water overnight, 1 per student
Activity 2: Germinating Seeds
- 100 lima beans
- 10 paper towels (the non-quilted paper towels typically found in schools work best)
- 10 pieces of plastic wrap
- 20 rubber bands
- The Little Plant poem
Activity 3: Egghead Plant Starters
- Needs of a Plant Powerpoint Slides
- Empty, rinsed eggshells, 1 per student
- Egghead plant starter example (see picture in procedures)
- Permanent markers
- Plastic spoons
- Water spray bottles
- Potting soil
- Alfalfa seeds*
- Dig a Hole song
*Alfalfa Seeds are available for purchase from agclassroomstore.com.
Activity 4: Sunflower Life Cycle Glove
- Knit glove
- Sticky-back Velcro
- Sunflower Life Cycle pictures, laminated and cut apart
- Life Cycle graphic organizer, 1 per student
Vocabulary
cotyledon: an embryonic leaf in seed-bearing plants, one or more of which are the first leaves to appear from a germinating seed
dormant: not active but able to become active
embryo: a human, animal, or plant in the early stages of development before it is born, hatched, sprouted, etc.
germinate: to begin to grow; sprout
photosynthesis: the process by which plants convert carbon dioxide, water, and light energy into sugars and oxygen in order to store energy; the opposite of cell respiration
respiration: the process through which a plant exchanges oxygen and carbon dioxide with its environment
seedling: a young plant that is grown from a seed
Background Agricultural Connections
The life cycle of a flowering plant begins with a seed. A seed contains an embryo—what will become a new plant—and food for the embryo. Seeds are dormant, or inactive, until they receive the correct amount of moisture and the proper temperature. With appropriate warmth and moisture, seeds will germinate, producing a tiny, immature plant called a seedling. The seedling will grow into a mature plant which, when fertilized, will produce seeds.
Plants need water, light, nutrients, and air to grow. Water requirements vary by plant species, but all plants need some amount of water. Most water enters the plant through the roots. Water is necessary for photosynthesis, the process through which light energy is converted into food for the plant. Too much or too little water can be harmful to a plant. It is important to know the water requirements of a particular plant to ensure you provide the proper amount for healthy growth.
Light requirements also vary by plant species. All green plants need light to perform photosynthesis, although the intensity, quality, and duration needs will differ. Understanding the light preferences of a plant is important when choosing an appropriate planting location.
Plants obtain nutrients from the atmosphere, soil, or fertilizers. Nutrients are important to the process of photosynthesis and for the metabolic functions of the plant. When soils are deficient, the missing nutrients should be added prior to planting.
The oxygen and carbon dioxide present in the air are important for photosynthesis and plant respiration—the process through which the plant exchanges oxygen and carbon dioxide with its environment. Plants appear to be constantly exposed to air, but it is important to understand that plant roots also need air. If too much water is present in the soil for an extended period of time, the roots cannot get enough air. Being aware of the type of soil and how quickly water moves through the soil is important for ensuring that the roots are getting the appropriate amount of air.
Engage
- Ask students, "Why are plants important?" Allow students to offer their answers to the question. Direct a class discussion with follow-up questions as needed to help students recognize that plants are very important. Many plants provide healthy food for us to eat. Other plants provide food for animals which provide milk, dairy products, meat, and eggs to our diet.
- Read one of the following books with your class:
Explore and Explain
Activity 1: Observing and Dissecting Seeds
 Ask students what seeds are used for. Explain that seeds are used to grow new plants and sometimes to eat.
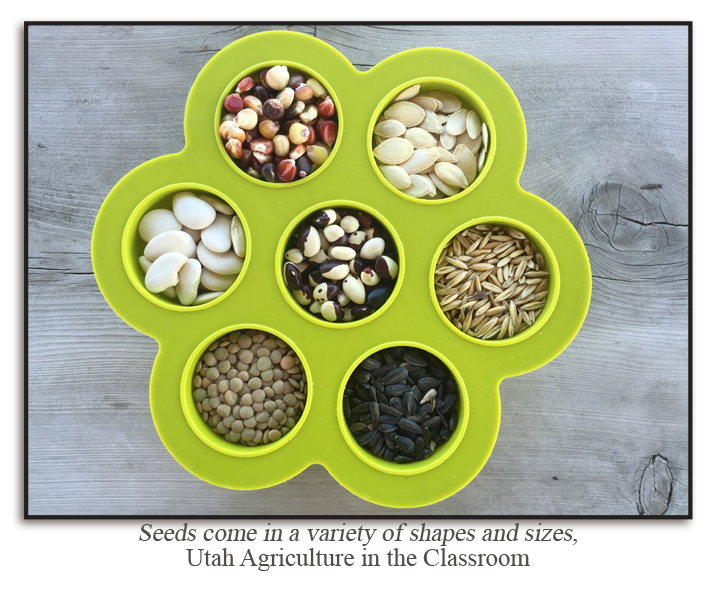
- Allow students to observe a variety of different types of seeds. Explain that seeds come in different sizes and colors, but they are all used to grow new plants. Some seeds are even eaten by humans and other animals. Ask the students if they have ever eaten a seed. What kind of a seed was it?
- Ask the students what is inside a seed. Show the Bean Seed Diagram. Point out that inside a seed there is an embryo—what will become a new plant—and food for the embryo. On the outside of the seed is a seed coat. Its purpose is to protect the seed.
- Tell the students that they are going to have the chance to look carefully at a lima bean seed that has been soaked overnight in water. They will observe the seed coat, embryo, and cotyledon of the seed.
- Give each student one lima bean seed. Show them how to rub the seed between their fingers to remove the seed coat. Ask the students why the seed coat is important. (it protects the seed)
- Show the students how to split the seed in half. Give each student a hand lens to observe the inside of the seed. Point out the embryo and cotyledons. Explain that the embryo is the beginning of a new plant. When the seed receives warmth and moisture, it will begin to germinate, which means it becomes active and sprouts. The cotyledons provide food for the embryo until it grows leaves. The leaves will then use energy from sunlight to carry out photosynthesis, making food for the plant.
Activity 2: Germinating Seeds
 Explain that dormant means to be inactive, like in a deep sleep. Active is the opposite of dormant. Most seeds are dormant until they receive warmth and moisture. When a seed receives the correct amount of moisture and the proper temperature, it will begin to germinate, which means it becomes active and sprouts.
- Ask each student to pretend they are a dormant seed in the soil. Tell them that it is spring, and the soil has become moist from rain showers and warm from the sun. They are now ready to germinate. Ask students to pretend to be germinating seeds sprouting into seedlings.
- Explain to the students that they are going to germinate seeds through a process called ragdoll germination. Gardeners, farmers, and scientists use this process to test germination rates of seeds.
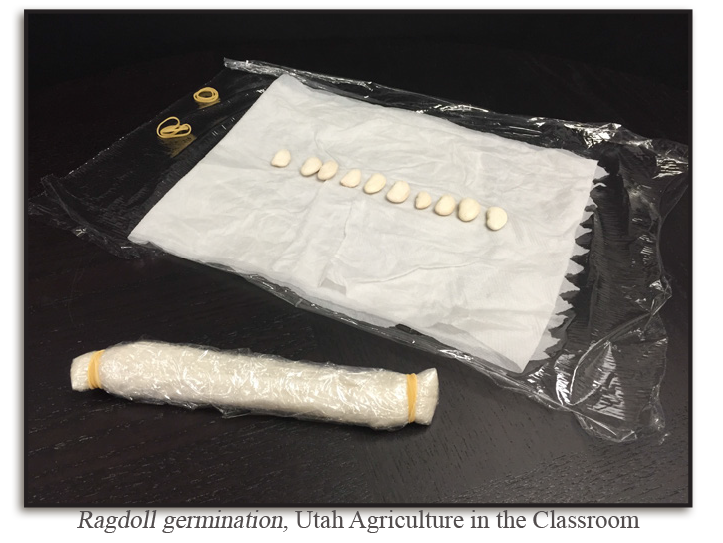
- Arrange students into ten small groups. Supply each group with a paper towel, plastic wrap, ten lima bean seeds, and two rubber bands. Have each group moisten a paper towel and squeeze out the excess water.
- Lay the plastic wrap out flat on a desk with the paper towel laid flat on top. Line ten seeds in the middle of the paper towel. Larger seeds work best for younger students.
- Fold the plastic wrap and paper towel in half and roll them into a round tube. Use rubber bands to cinch each end of the tube.
- Leave the ragdoll undisturbed in a warm place. After about one week, have each group open their ragdoll and count the seeds that germinated. Add each group’s count together and determine the percentage of seeds that germinated. This is the germination rate for the seed batch.
- Allow the students to observe the seedlings. Ask them what the seeds needed in order to germinate. (warmth and moisture) Ask the students if the seedlings have everything they need to continue to grow into healthy plants. Explain that plants need water, light, nutrients, and air to grow.
- Read the poem The Little Plant twice. Before rereading, ask the students to listen carefully to the poem and pretend to be a dormant seed or a germinating seed at the appropriate parts of the poem.
- Ask the students, “In the poem, where did the warmth that helped the seed germinate come from?” (The warmth came from the sun.) “Where did the moisture come from?” (The moisture came from the rain.)
Activity 3: Egghead Plant Starters
 Ask the students what plants need to grow. Use the Needs of a Plant PowerPoint Slides to help students understand that plants need water, light, nutrients, and air to grow.
- Explain to the students that they will be planting alfalfa seeds. Alfalfa is a flowering plant that is most commonly harvested as hay to be used as livestock feed.
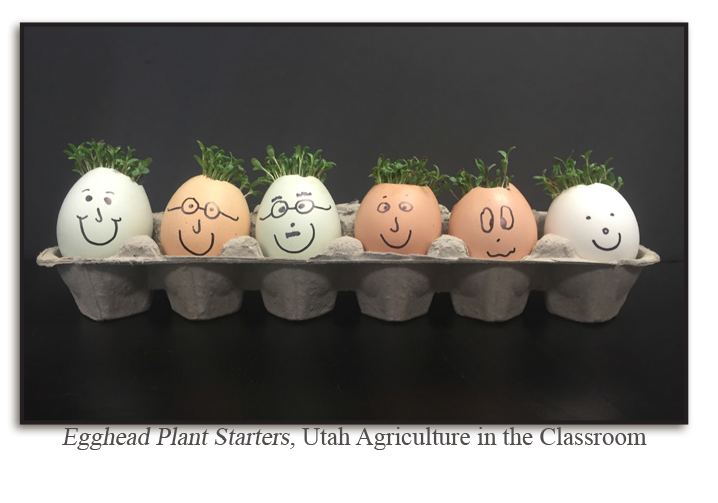
- Show the egghead plant starter example to the students. Explain that they will be creating eggheads to start their alfalfa. Give each student an empty, rinsed eggshell. They will use the permanent markers to draw a face on the shell and write their name on the opposite side.
- Show the students how to spoon soil into the eggshell. Use a water spray bottle to moisten the soil before planting half a spoonful of alfalfa seeds. Spoon a small amount of soil on top, enough to cover the seeds.
- Explain to the students that the alfalfa seeds will germinate in about one week. In order to germinate, the seeds will need warmth and moisture. Ask the students how they can help the seeds get the warmth and moisture they need to germinate. The students can moisten the soil with a water spray bottle three times a day and keep the eggheads near a sunny window so the sunlight can warm the soil.
- Once the plants are growing, they will need water, light, nutrients, and air to grow. Ask the students how they can meet the needs of their plants. They can water their plants and keep them in a sunny place. The soil will provide nutrients, and the plants will use the air that is in the classroom.
- Show the students movements to represent the needs of a plant. To represent water from rain, the students will start with their hands raised high over their heads and then wiggle their fingers as they lower them to the ground. To represent light from the sun, the students will make the shape of a circle above their heads with their arms. To represent nutrients from the soil, the students will pat the ground with their hands. To represent air, the students will breathe in air, close their mouths, and puff out their cheeks.
- Sing the song Dig a Hole with the students. Ask the students to make the movements they learned when the song says water, light, nutrients, and air.
- After about three weeks, the alfalfa will have grown into a nice head of hair for the egghead, and the plants will need more space. They will be ready to transfer to a garden. The plants and eggshells can be transferred together. The eggshells will add the nutrient calcium to the soil. Calcium benefits cell growth in plants. Before transferring the plant, crush the eggshell to help it break down faster in the soil.
Activity 4: Sunflower Life Cycle Glove
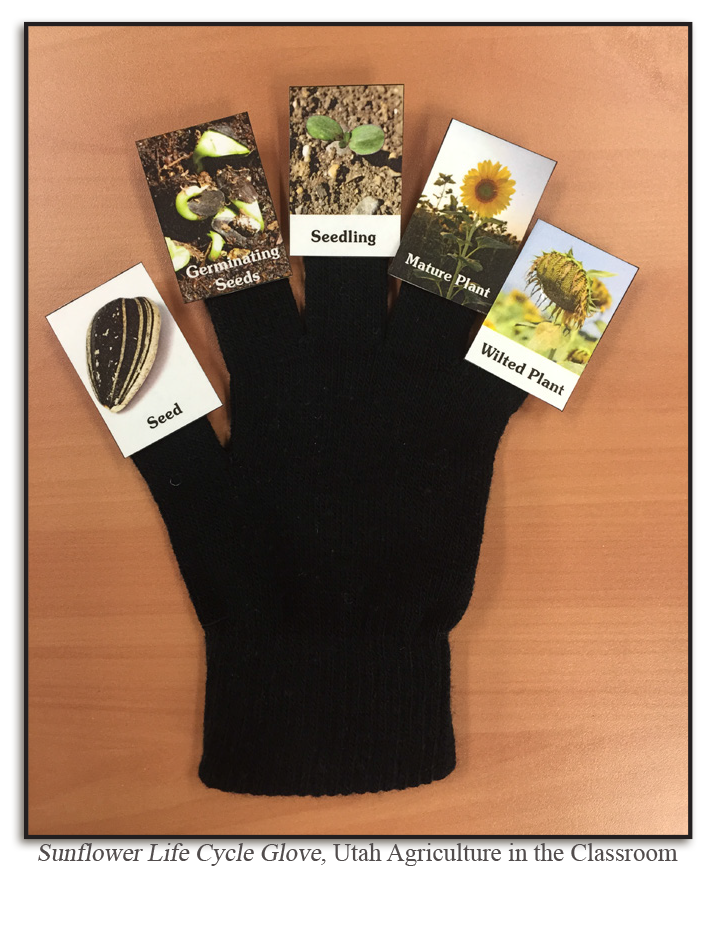
 Before beginning this activity, place Velcro on each palm-side finger of the glove and on the back of each laminated sunflower life cycle picture.
- Place the glove onto your left hand. Attach the picture of the sunflower seed to the thumb of the glove. Explain that the seed is dormant or inactive.
- Ask the students what the seed needs to germinate. The seed needs warmth and moisture to germinate. Attach the picture of the seed germinating to the index finger of the glove.
- When the seed germinates, it becomes active and sprouts into a seedling. Attach the picture of the seedling to the middle finger of the glove.
- The seedling grows into a sunflower plant that will bloom. Attach the picture of the mature sunflower plant to the ring finger of the glove. Ask the students what the plant needs to grow. The plant needs water, light, nutrients, and air to grow.
- After about four months, the sunflower will shrivel up and die. Attach the picture of the dead sunflower to the pinky finger of the glove. When the sunflower dies, it drops its seeds. Touch your pinky finger to your thumb and explain that the dropped seeds will germinate into seedlings, grow into a sunflower plant, die, and drop seeds that will continue the cycle.
- Give each student a copy of the Life Cycle graphic organizer. Have students either arrange copies of the Sunflower Life Cycle Pictures in order on the graphic organizer or draw their own pictures in the boxes.
Elaborate
-
Use the Time Lapse Radish Seeds Sprouting video or the Bean Time-Lapse video to show your students how seeds sprout and grow.
Evaluate
After conducting these activities, review and summarize the following key concepts:
- Plants are important resources in our lives.
- Farmers grow many types of plants for animals and humans to eat.
- Every plant has a life cycle. Farmers understand each plant's life cycle in order to harvest a good crop.
- Seeds need warmth and moisture to germinate.
- Plants need water, light, nutrients, and air to grow.
Recommended Companion Resources
- A Seed Grows
- A Seed is Sleepy
- Alfalfa Seeds
- Alice Waters and the Trip to Delicious
- Anywhere Farm
- Bean Seed Fun
- Big Yellow Sunflower
- City Green
- Every Little Seed
- Farm to Table & Beyond
- Farmer Eva's Green Garden Life
- Flower Garden
- Garden Planner
- Greening School Grounds: Creating Habitats for Learning
- How to Grow a Monster
- How to Use a Ragdoll Test to Estimate Field Germination
- Jayden's Impossible Garden
- Jo MacDonald Had a Garden
- Junior Master Gardener Handbook
- Junior Master Gardener Teacher & Leader Guide
- Las calabacitas de Zora (Spanish Edition)
- Learn, Grow, Eat, and Go!
- Maxine and the Greatest Garden Ever
- Memory Garden
- Miguel's Community Garden
- Mrs. Spitzer's Garden
- Muncha! Muncha! Muncha!
- Plant Secrets
- School Garden Center
- Seeds Go, Seeds Grow!
- Seeds for Terrariums
- Something, Someday
- Steps to a Bountiful Kids' Garden
- Sunflower House
- Sunflower Life Cycle
- The Amazing Life Cycle of Plants
- The Soil in Jackie's Garden
- This Year's Garden
- This is the Sunflower
- Uncle John's City Garden
- What's in the Garden?
- Zora's Zucchini